Sunday, July 11, 2010

Meat Temperature Guide

Got this in my email today and thought I'd share for those who are always concerned about the temps of the meat they cook. This guide will also help you to get your steak cooked exactly the way you like it! =)


Beef

Rare
USDA Guidelines (Before Resting): n/a
Professional Kitchens (Before Resting): 115 degrees

Medium-Rare
USDA Guidelines (Before Resting): 145 degrees
Professional Kitchens (Before Resting): 120 degrees to 130 degrees

Medium
USDA Guidelines (Before Resting): 160 degrees
Professional Kitchens (Before Resting): 140 degrees

Medium-Well
USDA Guidelines (Before Resting): n/a
Professional Kitchens (Before Resting): 150 degrees

Well-Done
USDA Guidelines (Before Resting): 170 degrees
Professional Kitchens (Before Resting): 155 degrees to 160 degrees

Ground Beef
USDA Guidelines (Before Resting): 160 degrees
Professional Kitchens (Before Resting): 160 degrees


Pork

Medium
USDA Guidelines (Before Resting): 160 degrees
Professional Kitchens (Before Resting): 145 degrees

Well-Done
USDA Guidelines (Before Resting): 170 degrees
Professional Kitchens (Before Resting): 160 degrees

Ground Pork
USDA Guidelines (Before Resting): 160 degrees
Professional Kitchens (Before Resting): 160 degrees


Poultry

Whole Bird, Thighs, Legs, Wings, Ground Poultry
USDA Guidelines (Before Resting): 165 degrees
Professional Kitchens (Before Resting): 165 degrees

Boneless Chicken Breasts
USDA Guidelines (Before Resting): 165 degrees
Professional Kitchens (Before Resting): 160 degrees


Lamb


Rare
USDA Guidelines (Before Resting): n/a
Professional Kitchens (Before Resting): 110 degrees to 115 degrees

Medium-Rare
USDA Guidelines (Before Resting): 145 degrees
Professional Kitchens (Before Resting): 130 degrees

Medium
USDA Guidelines (Before Resting): 160 degrees
Professional Kitchens (Before Resting): 140 degrees

Medium-Well
USDA Guidelines (Before Resting): n/a
Professional Kitchens (Before Resting): 145 degrees to 150 degrees

Well-Done
USDA Guidelines (Before Resting): 160 degrees
Professional Kitchens (Before Resting): 150 degrees to 155 degrees

Ground Lamb
USDA Guidelines (Before Resting): 170 degrees
Professional Kitchens (Before Resting): 160 degrees

Sunday, June 6, 2010

Copycat Max & Erma's Chicken Tortilla Soup


Yields approx. 15 servings

Ingredients
4 chicken breasts, cooked and chopped
2 cans cream of mushroom soup
2 cans cream of chicken soup
2 cans cream of celery soup
2 cans cheddar cheese soup
2 cans chicken broth
1 can diced tomatoes
1 cup chunky salsa
1 can diced rotel, mild
1 onion, chopped
1/4 cup fresh cilantro, chopped (optional)
4 garlic cloves, minced
1 teaspoon red chili powder
salt, to taste
pepper, to taste

Directions

In a large (8-10 quart) stockpot combine and whisk together until smooth all eight cans of soup.

Add chicken broth. Add tomatoes, salsa, green chiles, onion, garlic, chili powder, salt and pepper.

Bring all ingredients to a full boil, reduce heat, and simmer for 1 hour.

Add cilantro and chicken breast chunks. Simmer 45 minutes to an hour.

While soup is simmering, make your soup toppings:

Tortilla Strips

Cut flour tortillas into small thin strips.

Heat oil and deep fry tortilla strips until lightly browned.


To serve: Ladle soup into bowls, top with shredded cheese and fried tortilla strips.

Enjoy!

Sunday, May 30, 2010

Copycat Olive Garden House Dressing

Ingredients:

1/2 c. white vinegar
1/3 c. water
1/3 c. vegetable oil
1/4 c. corn syrup
2 1/2 Tbl. grated romano cheese
2 Tbl. dry pectin
2 Tbl. beaten egg
1 1/4 tsp. salt
t tsp. lemon juice
1/2 tsp. minced parsley
1/2 tsp. minced garlic
Pinch dried oregano
Pinch crushed red pepper flakes

Instructions:

Combine all ingredients in blender. Blend well. If there are flicks of ingredients in the dressing, you can use cheese cloth or a small colander to strain it. Chill at least 1 hour.

Monday, May 10, 2010

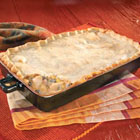
Fiesta Chicken Casserole


Original Recipe Yield 4 servings
Prep Time:
15 Min
Cook Time:
40 Min
Ready In:
55 Min
Ingredients
  • 1 (15 ounce) package refrigerated pie crust
  • 1 (16 ounce) jar Pace® Chunky Salsa
  • 1 (10.75 ounce) can Campbell's® Condensed Cream of Chicken Soup or Campbell's® Condensed 98% Fat Free Cream of Chicken Soup
  • 1 cup sour cream
  • 2 cups shredded Cheddar cheese
  • 1 (24 ounce) package frozen whole kernel corn
  • 2 (9.75 ounce) cans Swanson® Premium Chunk Chicken, drained
  • 1 (15 ounce) can black beans, drained and rinsed

Directions

  1. Preheat oven to 400 degrees F. Bring pie crust to room temperature.
  2. Mix salsa, soup, sour cream, cheese, corn, chicken and beans in large bowl. Spoon into ungreased 13x9x2-inch baking pan.
  3. Place crusts on floured surface, overlapping about 3 inches in the center. Press seam to seal. Roll into 14x10-inch rectangle. Trim excess crust. Place crust over beef mixture and flute edges. Cut slits in pastry.
  4. Bake for 40 to 45 minutes or until pie crust is golden brown.

Friday, April 30, 2010

MP3/Cell Phone/Camera Pod

I just realized that I completely forgot to post this! I made these for my twin cousins for Christmas. The photo is one I made for Abby, Aaron's was Camouflage. This was a super easy pattern and only took me about a half hour to make. There is a button on either side and a yarn loop to hold the fold in place. You can unbotton it and roll the fold up for added protection when put into an overnight bag or a purse. It will fit just about anything such as an Ipod, Cell Phones, Cameras, etc.

Wednesday, April 14, 2010

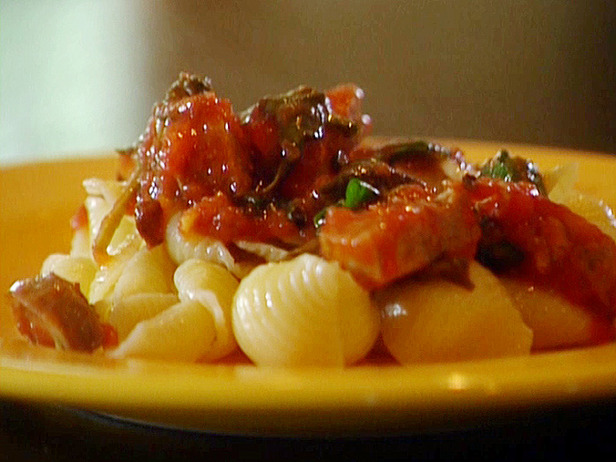
Yummy Basil Tomatoes


Basil Tomatoes are fabulous and I know you'll love them! You can use them in many different ways. They are good alone and for topping other things. You can top Pasta, Chicken, Italian Sausages, Soups, Salads, the possibilities are really endless and they are super easy to make!

2 Tablespoons Corn Oil
2 Tablespoons White Vinegar
1 Teaspoon Salt
1 Teaspoon Olive Oil
1/2 Teaspoon Sugar(add to taste if you prefer sweeter)
1 Garlic Bud Crushed
1 Teaspoon Basil Crushed

Cut Tomatoes in Wedges, they work great if you peel them first but are just as great with the peeling on.

Add to Mixture.

The longer you leave the Tomatoes in the mixture the better they get. I usually let them sit at least 45 minutes to an hour before serving. Enjoy!

Friday, March 26, 2010

Easy Color Pop Tutorial

I use Photoshop CS4. The photos in the tutorial were done in CS3. There are some other programs that you can use that are similar as long as you have layers and can go into a Channels tab.
Step 1:
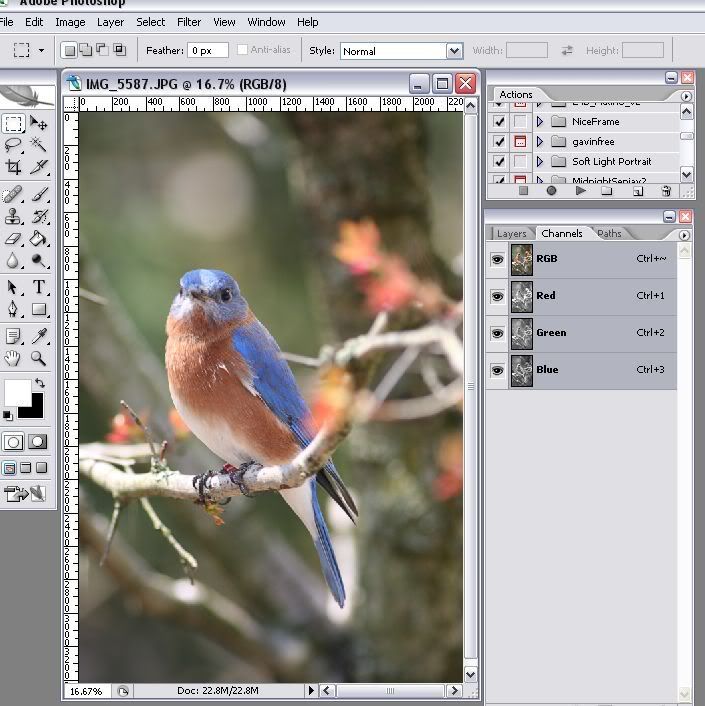
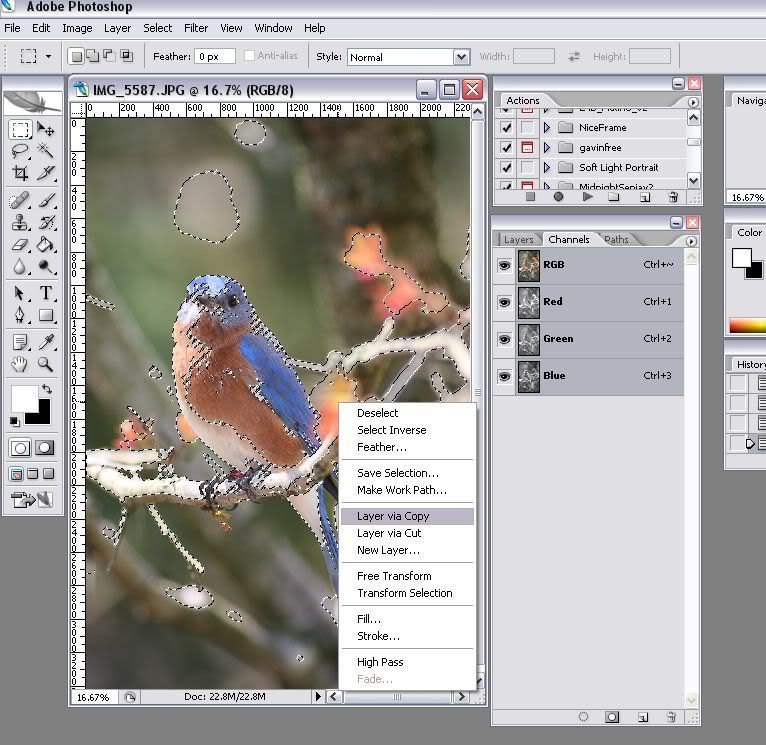
Open the photo that you are wanting to add a color pop to and then click on the "Channels" tab.

(CLICK ALL PHOTOS TO VIEW LARGER)


Step 2:
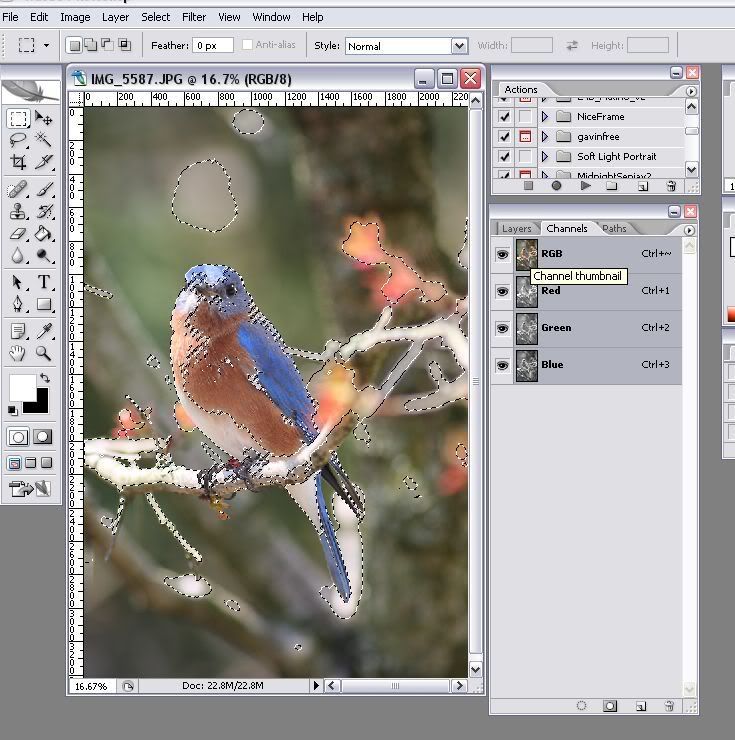
Holding down CTRL, click on the RGB Layer. This will highlight pixels as shown in the photo.


Step 3:
With any tool except the magnifying glass selected, Right click anywhere on the photo and select "Layer via Copy"


Step 4:
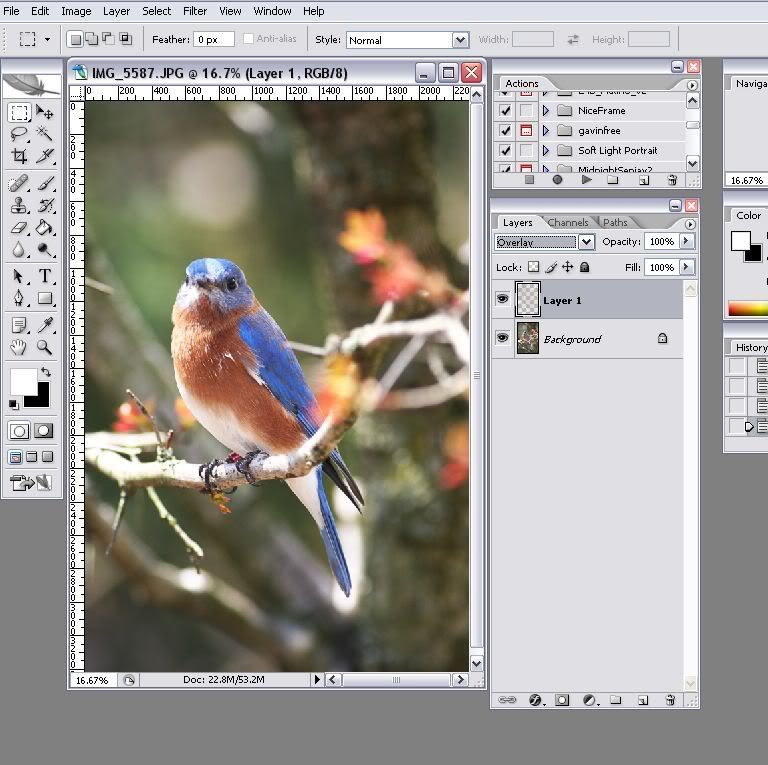
After you have done the previous step of making a copy layer, click on the "Layers" tab. Your layer will appear above the background layer as shown. With the Layer selected, click on the Layers pull down tab and select "Overlay" If you click the eyeball icon on and off you will see a difference. To add even more, simply copy the layer as many times as you'd like(CTRL+J) You can also adjust the Opacity to your preference. When you are finished, simply flatten the image and save.


Here is my finished product with the before and after:


I also added a small vignette to it as well.