

Friday, April 30, 2010
MP3/Cell Phone/Camera Pod
I just realized that I completely forgot to post this! I made these for my twin cousins for Christmas. The photo is one I made for Abby, Aaron's was Camouflage. This was a super easy pattern and only took me about a half hour to make. There is a button on either side and a yarn loop to hold the fold in place. You can unbotton it and roll the fold up for added protection when put into an overnight bag or a purse. It will fit just about anything such as an Ipod, Cell Phones, Cameras, etc.


Wednesday, April 14, 2010
Yummy Basil Tomatoes
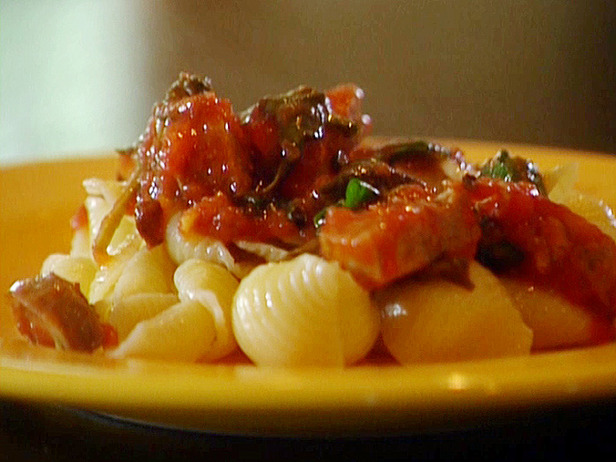
Basil Tomatoes are fabulous and I know you'll love them! You can use them in many different ways. They are good alone and for topping other things. You can top Pasta, Chicken, Italian Sausages, Soups, Salads, the possibilities are really endless and they are super easy to make!
2 Tablespoons Corn Oil
2 Tablespoons White Vinegar
1 Teaspoon Salt
1 Teaspoon Olive Oil
1/2 Teaspoon Sugar(add to taste if you prefer sweeter)
1 Garlic Bud Crushed
1 Teaspoon Basil Crushed
Cut Tomatoes in Wedges, they work great if you peel them first but are just as great with the peeling on.
Add to Mixture.
The longer you leave the Tomatoes in the mixture the better they get. I usually let them sit at least 45 minutes to an hour before serving. Enjoy!
Friday, March 26, 2010
Easy Color Pop Tutorial
I use Photoshop CS4. The photos in the tutorial were done in CS3. There are some other programs that you can use that are similar as long as you have layers and can go into a Channels tab.
Step 1:
Open the photo that you are wanting to add a color pop to and then click on the "Channels" tab.
(CLICK ALL PHOTOS TO VIEW LARGER)

Step 2:
Holding down CTRL, click on the RGB Layer. This will highlight pixels as shown in the photo.

Step 3:
With any tool except the magnifying glass selected, Right click anywhere on the photo and select "Layer via Copy"

Step 4:
After you have done the previous step of making a copy layer, click on the "Layers" tab. Your layer will appear above the background layer as shown. With the Layer selected, click on the Layers pull down tab and select "Overlay" If you click the eyeball icon on and off you will see a difference. To add even more, simply copy the layer as many times as you'd like(CTRL+J) You can also adjust the Opacity to your preference. When you are finished, simply flatten the image and save.

Here is my finished product with the before and after:

I also added a small vignette to it as well.
Step 1:
Open the photo that you are wanting to add a color pop to and then click on the "Channels" tab.
(CLICK ALL PHOTOS TO VIEW LARGER)
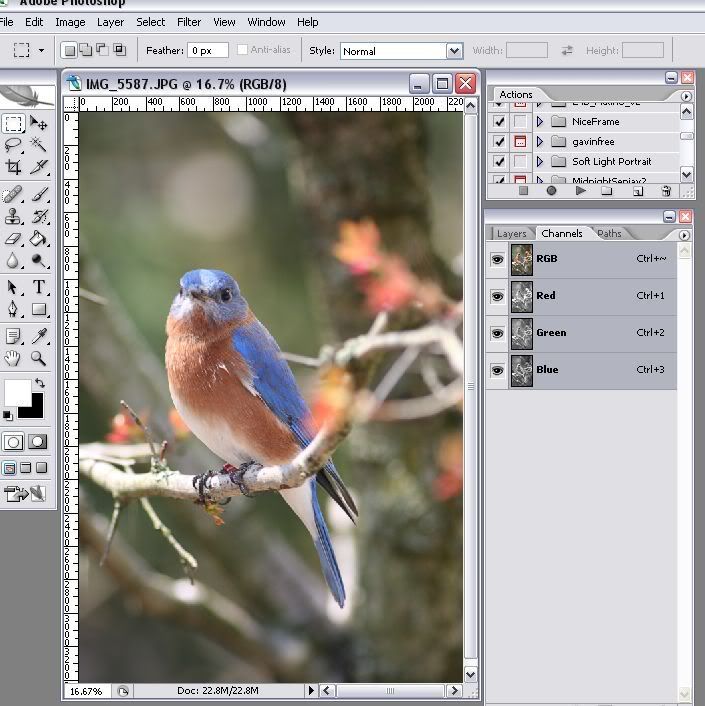
Step 2:
Holding down CTRL, click on the RGB Layer. This will highlight pixels as shown in the photo.
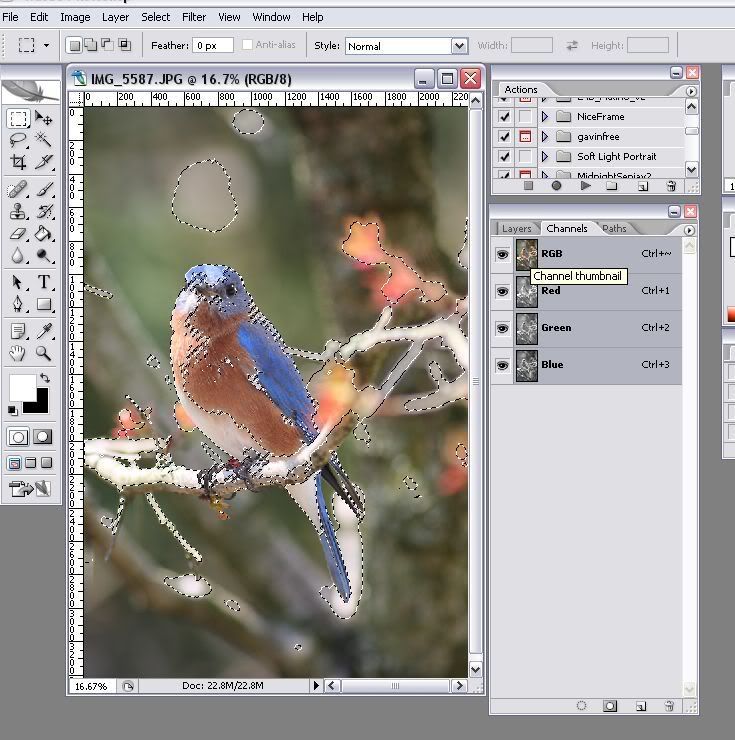
Step 3:
With any tool except the magnifying glass selected, Right click anywhere on the photo and select "Layer via Copy"
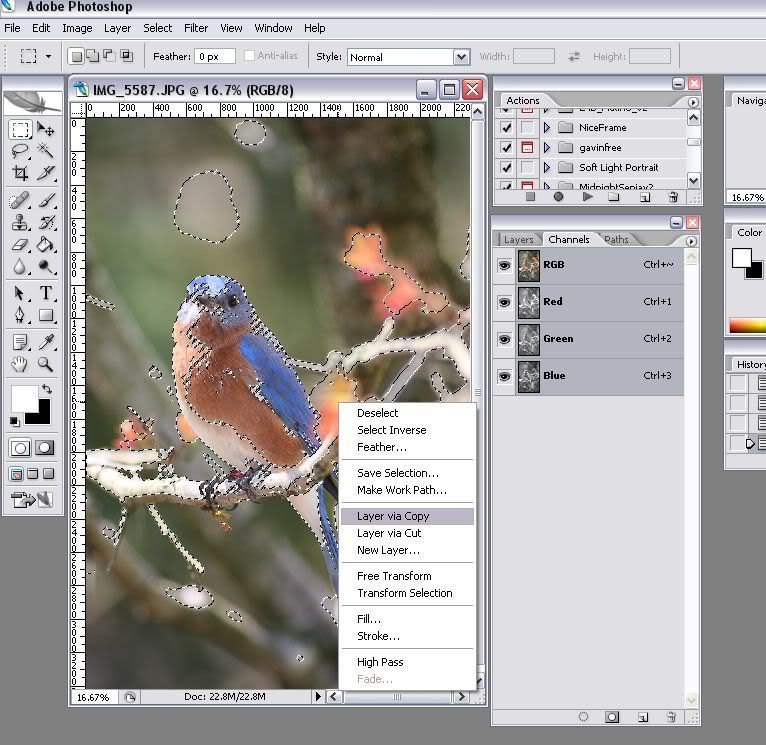
Step 4:
After you have done the previous step of making a copy layer, click on the "Layers" tab. Your layer will appear above the background layer as shown. With the Layer selected, click on the Layers pull down tab and select "Overlay" If you click the eyeball icon on and off you will see a difference. To add even more, simply copy the layer as many times as you'd like(CTRL+J) You can also adjust the Opacity to your preference. When you are finished, simply flatten the image and save.
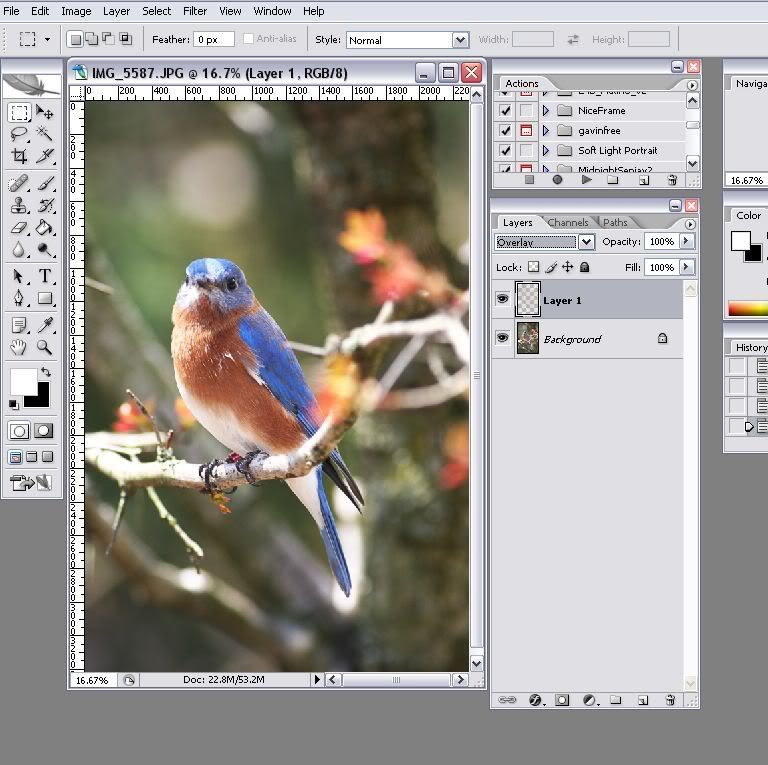
Here is my finished product with the before and after:
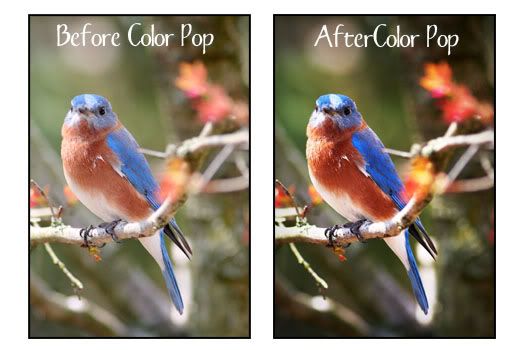
I also added a small vignette to it as well.
Thursday, March 4, 2010
Hawaiian BBQ Bacon Burgers
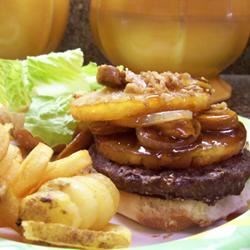
These are fabulous! Seasoned hamburger and a slice of pineapple grilled, and wrapped in bacon. It's so easy and adds a wonderful flavor to a regular burger! I must stress though, when you add the BBQ sauce to the meat, don't let it sit for long because the sauce breaks down the meat and makes it very, very tender and it will start to fall apart.
Ingredients
- 2 pounds lean ground beef
- 1/2 cup prepared barbecue sauce(I used a honey BBQ)
- 1 (8 ounce) can sliced pineapple
- Bacon Slices(I used a thick cut)
Directions
- Prepare grill for indirect cooking. If you don't have an indoor grill/griddle, you can also use a large skillet.
- In a large bowl, mix together hamburger meat and barbecue sauce. Season with salt and pepper.
- Shape mixture into 4 large patties. Place a slice of pineapple on top of each. Crisscross 2 bacon strips around each burger, and secure with toothpicks.
- Brush oil on grate. Place burgers on grill over medium low heat. Cook, covered, until the burger is cooked through. Turn often to avoid burning the bacon.
If you prefer, you can cook everything separately and assemble at the end. It's awesome to sear the pineapples in a skillet that the bacon was fried in! You can also add any topping you'd like such as caramelized onions. Enjoy!
Thursday, February 11, 2010
Chicken Pot Pie
I made this recipe just last night and it's wonderful, so naturally, I want to share it! Enjoy!

Ingredients:
1 pound(2-3 small) skinless, boneless chicken breast halves - cubed
1 cup sliced carrots
1 cup frozen green peas
1/2 cup sliced celery
1/3 cup butter
1/3 cup chopped onion
1/3 cup all-purpose flour
1/2 teaspoon salt
1/4 teaspoon black pepper
1/4 teaspoon celery seed
1 3/4 cups chicken broth
2/3 cup milk
2 (9 inch) unbaked pie crusts
Directions:
1. Preheat oven to 425 degrees F (220 degrees C.)
2. In a saucepan, combine chicken, carrots, peas, and celery. Add water to cover and boil for 15 minutes. Remove from heat, drain and set aside.
3. In the saucepan over medium heat, cook onions in butter until soft and translucent. Stir in flour, salt, pepper, and celery seed. Slowly stir in chicken broth and milk. Simmer over medium-low heat until thick. Remove from heat and set aside.
4. Place the chicken mixture in bottom pie crust. Pour hot liquid mixture over. Cover with top crust, seal edges, and cut away excess dough. Make several small slits in the top to allow steam to escape.
5. Bake in the preheated oven for 30 to 35 minutes, or until pastry is golden brown and filling is bubbly. Cool for 10 minutes before serving.

Ingredients:
1 pound(2-3 small) skinless, boneless chicken breast halves - cubed
1 cup sliced carrots
1 cup frozen green peas
1/2 cup sliced celery
1/3 cup butter
1/3 cup chopped onion
1/3 cup all-purpose flour
1/2 teaspoon salt
1/4 teaspoon black pepper
1/4 teaspoon celery seed
1 3/4 cups chicken broth
2/3 cup milk
2 (9 inch) unbaked pie crusts
Directions:
1. Preheat oven to 425 degrees F (220 degrees C.)
2. In a saucepan, combine chicken, carrots, peas, and celery. Add water to cover and boil for 15 minutes. Remove from heat, drain and set aside.
3. In the saucepan over medium heat, cook onions in butter until soft and translucent. Stir in flour, salt, pepper, and celery seed. Slowly stir in chicken broth and milk. Simmer over medium-low heat until thick. Remove from heat and set aside.
4. Place the chicken mixture in bottom pie crust. Pour hot liquid mixture over. Cover with top crust, seal edges, and cut away excess dough. Make several small slits in the top to allow steam to escape.
5. Bake in the preheated oven for 30 to 35 minutes, or until pastry is golden brown and filling is bubbly. Cool for 10 minutes before serving.
Monday, February 1, 2010
Ohio State LO

On January 1, 2010 the Ohio State Buckeyes played the Oregon Ducks in the 96th Rose Bowl. It was the first time that the Buckeyes had been to the Rose Bowl since 1997. The game was pretty close but the Buckeyes pulled it together and won 26-17. Roast duck anyone? O-H-I-O
By the way, the kit I used was made by yours truly =) If you would like to download it you can get it here.
Wednesday, January 27, 2010
New Things On The Way...
I am hoping that in the next couple of weeks I will be able to post several new things such as Scrapbooking Mini-Kits, Word Art, Photoshop Tutorials, etc. I don't think that I have ever posted any Photoshop Tutorials but I do have a few already made.
I have also been working on a lot of Custom Photo Card Designs to go with the ones that I already have. I am hoping that Ryan will help me get them set up on Ebay and maybe even Etsy. I will post those here as well.
I have been pretty busy trying to get a lot of photos re-edited for my photography business because I am hoping to get a new website up eventually. I had one in the past but I let my host run out because it was a lot more trouble than it was worth, in my opinion.
A week or so ago, Ryan received a Free Dell Server an he's been trying to get it running. I am hoping that we'll be able to figure everything out and I can host my website and even the things I post here so I won't have to deal with purchasing a host or posting things on 4shared. I mean, I like 4shared, but I don't have a premium account on there so I have to always make sure to log in occasionally so that my stuff doesn't get removed.
I am obviously just jibber jabbering right now so I am going to leave it at that... Look for new stuff to come very soon!
Tabby
I have also been working on a lot of Custom Photo Card Designs to go with the ones that I already have. I am hoping that Ryan will help me get them set up on Ebay and maybe even Etsy. I will post those here as well.
I have been pretty busy trying to get a lot of photos re-edited for my photography business because I am hoping to get a new website up eventually. I had one in the past but I let my host run out because it was a lot more trouble than it was worth, in my opinion.
A week or so ago, Ryan received a Free Dell Server an he's been trying to get it running. I am hoping that we'll be able to figure everything out and I can host my website and even the things I post here so I won't have to deal with purchasing a host or posting things on 4shared. I mean, I like 4shared, but I don't have a premium account on there so I have to always make sure to log in occasionally so that my stuff doesn't get removed.
I am obviously just jibber jabbering right now so I am going to leave it at that... Look for new stuff to come very soon!
Tabby
Subscribe to:
Posts (Atom)